Week of 8/28 - 9/1 and 9/5 - 9/8
Digital Art Foundation's Daily Objective's:
Tuesday, Sept. 5th, 2017 -
1. Watch short class demo on how to play with this project
2. Continue with Letter Portrait Project
- Have at least 3 different photos for each letter in your name in the "Name Project" folder on Network Server.
- Think about shooting from Various Angles and Distances
- Try Close Up vs. Extreme Close Up Macro or even Far Away
- Give yourself at least ten minutes to import new photos to "Name Project" folder on the Network Server, not the google drive.
- Double check to see if you can find your images from the folder tab on the bottom of the welcome screen.
3. Begin putting your Letter Portrait together in Photoshop based off of the following instructions on the Project Objective Projects Handout and AFTER browsing through the links below.
- Photoshop Selection Tools/Skills (youtube video) &
- Refine Edge Tools (informational guide)
Thursday, Aug. 31st and Friday, Sept. 5th 2017
Task: Learn to "OBSERVE" the world around you, not just "see" it.
1. As a class we will watch a TED TALK Video, Rob Forbes, Ways of Seeing to more deeply understand what it truly means to notice your everyday environment.
1. As a class we will watch a TED TALK Video, Rob Forbes, Ways of Seeing to more deeply understand what it truly means to notice your everyday environment.
- click here to read along with the Interactive Transcript

|
|

|
Below: ABC Nature youtube video: https://www.youtube.com/watch?v=JkfBQeJeV00
|
2. Continue with Letter Portrait Project
|

|
*** Here's one more video if you are still stumped: Alphabet nature video on youtube
Monday, August 28th, 2017 -
TASK: Get comfortable with Classroom Computers and your AHS Google Platform
Step 1: Login to AHS computers (desktop/laptop) using your Animas High School Network Server account
Step 2: Login to your Google Account via G DRIVE copied into your NEW NETWORK SERVER folder
Step 3: Open a new Internet Window, login into your GMAIL and then...
Step 4: Show me all of the above and then "paint" on a new document in Adobe Photoshop (US PAPER size)
TASK: Get comfortable with Classroom Computers and your AHS Google Platform
Step 1: Login to AHS computers (desktop/laptop) using your Animas High School Network Server account
- user name = r.mcknight21 (yourfirstinitial.lastnamelast2digitsyrofgraduation)
- password = animas2021 or animas2020 or animas2019
Step 2: Login to your Google Account via G DRIVE copied into your NEW NETWORK SERVER folder
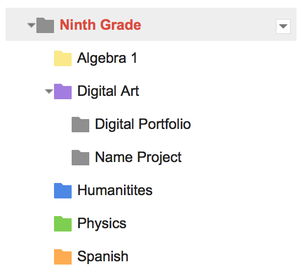
- Create a "9th or 10th or 11th Grade" folder in your Google Drive
- In your "9th/10th/11th Grade" folder, create a new folder for each of your classes you are currently taking.
Step 3: Open a new Internet Window, login into your GMAIL and then...
- Customize Themes and add a signature through your settings
Step 4: Show me all of the above and then "paint" on a new document in Adobe Photoshop (US PAPER size)
|
Settings Menu in your AHS GMAIL:

|
Folder Organization in your AHS G DRIVE:
|
Tuesday, August 29th, 2017 -
TASK: Create a “surrounding environment” inspired Letter Portrait of your name in Adobe Photoshop.
Digital Literacy skills covered:
TASK: Create a “surrounding environment” inspired Letter Portrait of your name in Adobe Photoshop.
Digital Literacy skills covered:
- Utilizing the AHS SERVER FOLDERS (then, eventually uploading to your google cloud account for backup and easy sharing)
- Camera check in/out norms and other tech classroom policies
- Letter Portrait of your Name and an intro to Photoshop Mini-Project Rollout

MONDAY 8/28 - you should complete these 5 steps:
Step 1: Log in to computers using your Animas High School Network Server account
Step 3: Check out Camera Box or iphone Cord.
Step 4: Take Photos of the letters in your name with my Camera or your Smart Phone.
Step 5: IMPORT your photos from the camera/smartphone to your "Name Project" folder on your network server so that you can access them from any computer in this classroom!
Mini Project Guidelines:
OBJECTIVE: Show me what you already know (or just from my demonstration) about Photoshop Selection Tools/Skills (youtube video) & Refine Edge Tools (informational guide) to create an original cut and paste Letter Portrait of your Unique Name (11 in. X 8.5 in. - 300 res).
How to get Started on your Project:
Questions to Consider:
- user name = r.mcknight21 (yourfirstinitial.lastnamelast2digitsyrofgraduation)
- password = animas2021 or animas2020 or animas2019
Step 3: Check out Camera Box or iphone Cord.
Step 4: Take Photos of the letters in your name with my Camera or your Smart Phone.
Step 5: IMPORT your photos from the camera/smartphone to your "Name Project" folder on your network server so that you can access them from any computer in this classroom!
Mini Project Guidelines:
OBJECTIVE: Show me what you already know (or just from my demonstration) about Photoshop Selection Tools/Skills (youtube video) & Refine Edge Tools (informational guide) to create an original cut and paste Letter Portrait of your Unique Name (11 in. X 8.5 in. - 300 res).
How to get Started on your Project:
- Create a new Photoshop Document (correct size stated below)
- Dimensions should be set to US PAPER (8.5 X 11 inches @ 300 res) and then ROTATED 90' degrees so that it is Horizontal
- Use the photos you captured to spell your name on the new document you just created in photoshop
- Navigate to the photos you already imported in the "Name Project" folder. To open them, right click on each photo and select open with Adobe Photoshop.
- Crop the letter. Select the letter. Refine Edge the letter. Copy (Ctrl C) and Paste (Ctrl V) the letter onto the document you just created.
- Move and Transform (Ctrl T) the letters to spell out your name on the 11in X 8.5 US PAPER Photoshop Document.
- Save As "Name Project in Progress" and then save (Ctrl S) your work often while you work so you avoid losing your work.
Questions to Consider:
- Have you thought about adding a background layer? Possibly an image or a color?
- Are your copied edges refined?
- When you are satisfied with your project and final Image -
- FILE > Save As "Name Project Final" (PSD format and JPEG) to your "Name Project" folder project on your Network Server.
- Then, show me your finished project (psd & jpeg formats) in your "Name Project" folder on your Network Server for credit.
- Finally, as with every project in this class, Upload your final project (JPEG format) to your Digital Art Page on your Digital Portfolio (as soon as we create those)
Want to take it in more? Watch:
- Ways of Seeing, Rob Forbes, TedTalk Video
